
Over the years, Backblaze’s Personal Backup service has helped our customers restore over three billion files. That’s a lot of photos, videos, documents, and more. While a majority of our data restores are to “Restore All My Data,” many of our customers have also restored a single file or a handful of files and folders. You, too, can restore any of the files and folders you have backed up to Backblaze. For example, Ilene was able to restore a file she needed while traveling—it’s easy, convenient, and secure.
To help you restore the files you have stored with Backblaze, we’ve put together a little step-by-step below:
- On any PC or Mac, open a web browser.
- Go to the Backblaze website and log in with your Backblaze account information.
- Choose the system that contains the file or files you wish to restore and select “Restore File” for that system.
 |
- You will be taken to the “View/Restore Files” screen for that computer and your folder/directory list will be loaded.
 |
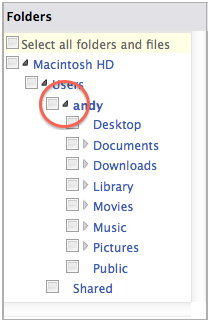
- To navigate to the file you wish to restore, start by clicking on the folder name, in this case “Macintosh HD.” For you, this folder will be the name of your system.
- Continue clicking on folder names to reach the file you are seeking. Once you have located the file you wish to restore, click on the box to the left of the file name.
 |
-
- Once clicked, the box will turn blue and show a checkmark. Also, the “Folders” list will show a dash in the blue box next to the folder, meaning at least one file in the folder is selected for restore.
- Using this method, you can select any combination of files and folders you wish to restore.
Helpful Hints:
- If you wish to “deselect” a file, simply click on the box next to the file name and the checkmark will disappear, so the file will not be restored.
- If you click the box next to the folder name in the folder list and a checkmark is displayed in that box, then all of the files and folders in the “checked” folder will be restored.
- If you wish to “deselect” a folder, simply click on the box next to the folder name until the box is empty and that folder and its contents will not be restored.
- While navigating to the files and folders you desire, if you wish to close an open folder, simply click on the black “triangle” to the left of the folder name (see below).
 |
 |
-
- Once you have selected all the files and folders you wish to restore, press the “Continue with Restore” button.
- At this point, your files will be located, copied and packaged into a ZIP file.
- Once packaging is complete you will be sent an email informing you that your restore is ready along with instructions on how to securely download the ZIP file containing your files.
- For a ZIP file larger than 2GB, you can use the Backblaze “Downloader,” otherwise you can use your browser to download the file.
- Once downloaded to your system, you unZIP your files and use them as desired.
The ZIP file containing your restored files is kept on the Backblaze restore server for seven days, after which it is deleted. You can also delete the restore file any time you wish before the seven days is up.
We recommend that everyone be familiar with how to restore their data from Backblaze. While the process is easy, it never hurts to practice.


